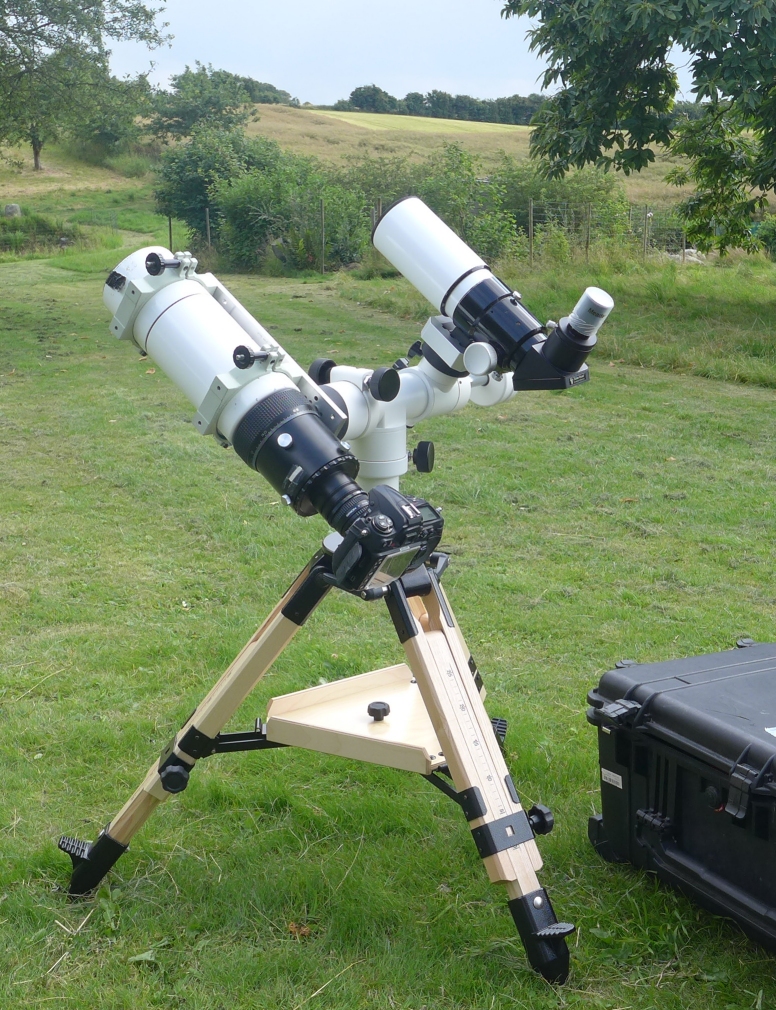
Tuesday, August 8, 2017

Grand rehearsal

Time for the grand rehearsal - doing everything I'm planning to do on eclipse day; outside in the real world. This is essential for success. I should be doing this many times, but - as usual - I am late and there's only time for one test.

Setting up went fine - I've done it many times already. Rotated the camera so that the diurnal motion aligned with the long axis of the sensor. This takes roughly half an hour, but there should be plenty of time during the partial phase for this.
Setting up for the grand rehearsal. If only the clouds would go away...

I struggled to focus on the sun using the white light filter and focusing mask. The extreme contrast of the scene (blank, white sun surrounded by blackness) confuses some automatic contrast adjustments to the liveview display - especially when I zoom in on the solar edge. This kind of focusing works beautifully on the moon and on stars. I don't know how to solve this! Maybe the eclipsed sun will work better. Maybe I'll just have to dump liveview and use actual images. I wonder how others do this?? Frustrating....

While fumbling with liveview I discovered that doing so eats up the battery extremely fast! Around 10-15 minutes of liveview is all it takes to fully deplete the battery. For all other camera operations the battery efficiency is really good, so this caught me by surprise. Not nice to discover on eclipse day. I have ordered two spare batteries since I only had one. Phwew....

The time to execute all 770 planned images is roughly one hour and I didn't experience any other battery problems. Switching memory cards went fine.

I tested placing the solar edge at the left edge of the field of view (FOV) at precisely 6 minutes prior to mid-eclipse. I have previously calculated that this should result in perfect framing during mid-eclipse. The image below is a combination of the first and last shot of my eclipse sequence. The centering is very good and diurnal drift is well contained within the FOV. Should work fine on eclipse day - I'll use Eclipse Orchestrator to calculate the precise time once we have arrived on location.
First and last shot from the totality imaging script combined. Framing is perfect! 

Apropos location: I tested using my smartphone to get the GPS coordinates. Worked fine using Google maps (touch and hold the blue 'here' indicator, see a red pin appear with the GPS coordinates displayed in the search box at the top). Now I just need to get a GPS certified time signal - haven't figured that out yet.


Sunday, August 6, 2017

Callibration frames

High resolution imaging of the corona has been pushed to stunning new heights by Miloslav Druckmüller and colleagues. An important feature of their work is more rigorous image processing than what is normally used. Doing this properly results in less image noise which in turn enables more aggressive image processing to bring out subtle details. Still, Miloslavs images do not look overly processed - they just look like the real thing as you can see visually unaided or with a small binocular.

To achieve low noise images it is vital to do proper image callibration; i.e. bias, dark and flat field correction. I do combined bias and dark correction by taking 40 images at each setting used during totality with the lens hood on and the setup covered by black cloth. These are taken just after totality has ended. I use 13 different settings during totality, so this amounts to 13x40=520 images! Afterwards the solar filter and lens hood is replaced by a white cloth, fastened with a rubber band. Using ISO 100 and whatever exposure time gives a signal around 1/3 of full well capacity (typically around 1/1000 sec) I then do 210 flat field images. Finally, 40 more bias+dark frames are taken at the same setting.

This is really boring work and it is done during the remaining partial phase of the eclipse. My DSLR card capacity is 8GB - equal to 296 full resolution raw images. I will be taking 77 images of totality, followed by 770 callibration images! I have two memory cards, so when one is full I'll switch card and start transferring images to my computer using a card reader. In this way the camera will be working non-stop and all images acquired in as short a time span as possible. This is important since the camera noise can vary with time and ambient temperature.

An overview of my complete imaging plan is shown below. I'll be running five Eclipse Orchestrator scripts over the course of one hour - resulting in 847 images. All just to get one - hopefully great - image of the eclipsed Sun!

Overview of my imaging plan, along with details of exposure settings and what to do when.
A typical flat field image. The response variations are ~5% of the total signal.

Wednesday, August 2, 2017

Filtering and masking

A solar filter is required for scope aiming, focusing and DSLR orientation prior to the eclipse. This filter is only removed during totality or else the camera will be fried. It must be fast and easy to remove without applying much force to the setup. The perfect solution for this is the solar safety film from Baader Planetarium. This is high quality, cheap and easy to build into a filter cell of your own making. My daughter and I had a fun rainy afternoon doing this using just some carton, gaffer tape and a circular cutting tool.
Building our Solar filter using Baader film.
Another important tool is the focusing mask. The solar disc does not offer much focusing help - you basically are left with gauging the fuzziness of the sharp horns of the eclipsed Sun. By using a simple mask with two opposing holes at the edge of the main objective two distinct images of the Sun will result. Even when slightly out-of-focus these two images will not overlap. Only at precise focus do they merge into one image, see an example below using the moon. Such a mask is a great tool for achieving tack-sharp focus on eclipse day. The last focusing tweak should be done 10-15 minutes before totality, thereby minimizing the risk of focus drift.

Solar filter and focusing mask.

Focussing on the moon using the mask. When out of focus two distinct images
are formed. Only at perfect focus do the merge into one.

Orientation and aiming

The DSLR camera can easily be rotated to any angle. The Sun is round, so you'd think that just getting the Sun properly centered would be enough. Wrong! The corona during solar minimum (which we are approaching) is elongated along the ecliptic.
Corona at solar minimum (left) and maximum (right).
Ecliptic is oriented along horizontal axis.
The Sun's motion in the sky due to Earths rotation (diurnal motion) is tilted relative to the ecliptic by the tilt of the Earths rotation axis. At the time of eclipse this angle is 20 degrees. For fixed mounts you want the long axis of the image roughly aligned with this motion so that there's as much image space as possible to contain the Sun's motion during the eclipse. It turns out that during this particular eclipse there is yet another reason for orienting the camera like this - and that reason is named Regulus!

Regulus is a bright (mag. 1.4) star, which - by fortunate cosmic coincidence - will be situated just 1.3 degrees from the Sun during totality. That can make for a nice visual: having a distant star embedded in the outer reaches of the corona. (It also helps a lot during image processing). I don't know if Regulus will be visible (and how much so) in my setup, but I'd like to give it a try. Below is shown the field-of-view (FOV) with my setup. The long axis of the image is aligned with the diurnal motion. The corona will be nicely framed, with the long equatorial extensions reaching out along the ecliptic. Regulus will also be well positioned.
Simulated field of view with my setup (Nikon D300, f=400mm). The bright star to the left is Regulus.
The time it takes for the Sun to move from the left-most edge to the center of my FOV is 6 minutes and 3 seconds, see the illustration below. I can get perfect framing during mid-eclipse by placing the edge of the crescent Sun precisely at the left edge of the DSLR viewfinder at the correct time. With totality lasting just over two minutes this time is five minutes before it starts. After arriving at the final location, I'll just have to calculate the precise time of second contact, then do this final telescope aiming 5 minutes before that time. This will be the final adjustment required and then I can ignore the imaging setup completely - confident of perfect framing and being able to enjoy the eclipse with my own senses!
Placing the crescent Sun at the left edge of the FOV precisely 5 minutes before
totality starts will result in perfect framing at mid-eclipse. 

Thursday, July 27, 2017

Checking collimation and killing fringes

After many cloudy days and nights I finally had the chance to test two things:
  1. does collimation of the F/4 refractor hold up against time and handling?
  2. how much can the blue fringes of my ED optics be improved by filtering?
Ten days ago I succesfully collimated the optics of my refractor - operating at F/4 is quite unforgiving in terms of alignment. However, it is not enough just to be able to collimate the scope and take images. I must be able to collimate the scope the evening before the eclipse, transport it for many hours in a bus over bumpy roads - and then get sharp images after setting up in the field. It has now been 10 days since the first collimation and I've transported the scope a couple hundred kilometers by car and handled the scope quite a bit.

Testing the scope on the artificial star showed that collimation had remained good! I did not even tweak it before continuing. Next, I aimed at Vega, focused using liveview in Imagesplus and ran the Eclipse Orchestrator script that will be used during the eclipse. This gave lots of shots, from which three closeup images at three different exposure times are shown below. The stellar FWHM is around 2-2.3 pixels - a bit more than last time but that could be due to different seeing conditions. The image scale is 2.86 "/pixel, so my angular resolution is around 6".
Closeup views of Vega at three different exposure times.
The new 'fringe killer' filter was installed for the images above, but to really see the effect I have compared saturated images of Vega (1/2.5 sec, ISO 200) to identical exposures taken an earlier night without the filter. As seen below, the filter clearly reduces the intensity of the blue halo. I'd say that anything the size, price and convenience of this filter, that will help improve coronal contrast, is very welcome in my setup!
Saturated exposures of Vega showing how the Fringe Killer filter helps reduce the intensity of the blue halo.
A more quantitative analysis of the filter performance is shown below. The graphs were made by averaging all lines of the images above. The red/green channels are unaffected by the filter, while the blue channel is reduced by ~35%. Definitely worth the effort!
Line averages from the Vega images above. Red, green, blue lines correspond to each color channel of the image; dotted lines are without the filter while full line is with filter.

Monday, July 24, 2017

Getting aligned...

During my last session I found that the Borg F/4 refractor was poorly collimated - not really very surprising since I hadn't done any adjustments after assembling the scope parts. In the past, I have not been able to satisfactorily collimate the optics of this scope - there just wasn't enough travel in the main objective adjustment screws. So, I was a bit worried whether I could do it this time. If not, then I'd have to ditch this configuration and go with the main objective at F/6.4 without field reducing optics.

Last evening I set up for collimation using an 'artificial star' on a tripod 70 meters away. With a 13mm eyepiece and a 5x Televue Powermate it was easy to see the in-focus diffraction rings - they were indeed way off as the previous test session had suggested. This time I had no problems getting good collimation; although it was at the extreme end of the refractor's possible adjustment range.

Right after doing this I attached the DSLR and aimed the scope at Vega, focusing in liveview with Imagesplus like before. Then I ran the Eclipse Orchestrator script, running through various exposure settings. The image below shows three identical shots before and after collimation (exposure time 1/320 sec, ISO 100). The improvement is dramatic: FWHM has decreased from 4.3 to 1.8 pixels - great!!!! The next question is: how stable is the collimation? I need the scope to be able to take some handling and still retain excellent collimation, since it won't be possible to fiddle with that on eclipse day. I'll do some scope handling and then repeat this test a week later to see if collimation holds.

Close-up images of Vega before and after collimation of the Borg F/4 scope.
A longer exposure is shown below - the blue halo seen last time is still very apparent. This reveals a limitation of my optics: they are not true apochromatic; 'only' extra dispersion (ED) corrected. This will reduce contrast of fine coronal details and produce a blue ring where the black moon meets the bright inner-corona. However, the problem can be alleviated with the 'Fringe Killer' filter which reduces the blue/violet component of the spectrum. I ordered the 2" version which will fit inside my existing adapter, roughly 2" in front of the DSLR sensor. Can't wait to test this out!
Longer exposure reveals a blue/violet halo, as expected from ED optics. I want to avoid this on eclipse day!
A final thing I learned this evening was just how long I can expose without experiencing image smear due to diurnal motion. The image below is a one second exposure; it is fairly clear that half a second will have no image smearing.
Smearing of stellar image during 1 sec exposure due to diurnal motion.

Friday, July 14, 2017

Putting the pieces together....

The new tripod and alt-az mount has arrived and look very nice - great workmanship and finish. The compactness of the tripod and dual-scope capacity of the mount will do wonders in reducing the amount of gear I need to haul along. I am using a simple aluminium plate to connect the Borg refractor to the mount - it needs to be offset pretty far from the mount to ensure proper balancing.
Berlebach tripod and TS AZ5 mount with the two refractors that I'll be using for the upcoming total solar eclipse.

Next step is to connect all the parts and do some field testing of the imaging setup. I need to find out if the setup suffers from vibrations and investigate if the optical quality of the 4" f/4 refractor is OK. Doing this is really simple: just set up like it's a total solar eclipse, point the scope at Vega and run the Eclipse Orchestrator script. This script runs through a number of exposures, ranging from 1/800 to 1.3 second. The short exposures will primarily sample the optical quality while the longer ones will be sensitive to vibrations.
In-focus stellar images taken with Borg 4", f/4 refractor. Scope was not collimated prior to this test.
I focussed the scope using a zoomed liveview display on my laptop. A bright blue halo appeared around Vega at focus and the highly out-of-focus image was not perfectly round. This is not indicative a excellent optical performance! I was in a hurry, so I pressed on running the script. Below are shown six images from the run; three at 1/320 second exposure and three with 1.3 seconds. Each series shows the same star which is near the center of the field. From these shots I conclude:
  1. The short exposures are generally sharper and more variable - both effects are due to atmospheric seeing.
  2. The short exposures reveal an asymmetrical halo - this is likely due to optical misalignment within the scope.
  3. The long exposures show no signs of vibration
The refractor used for this test consists of a Borg 4" f/6.4 ED lens coupled with field corrector and reducer lenses to yield f/4. Such a fast configuration does require careful attention to mechanical alignment of the optical elements - and I did none prior to this test. I have previously done tests at f/6.4 where I could reach FWHM=3.2 pixels.

Next step is to try and improve the collimation of the f/4 configuration - if I can't get it satisfactory I'll go for f/6.4 and the sharper images. Perhaps it would also be beneficial to use a filter to reduce the blue wavelengths - this is known to improve contrast with achromatic and ED refractors.

Saturday, May 20, 2017

Over the years I've hauled many different setups to solar eclipses - and this year is no exception. Each time I have some different ambition, requirement or constraint.

To photograph totality I want to use a 15 year old Borg 100ED F/4 refractor. This instrument isn't too heavy and is fairly compact. The camera will be a Nikon D300 - not state of the art, but this is what I have. I do have lightweight and heavy-duty tripods and mounts which I've used before. However, these are either too little or too much - resulting in either non-optimal images or very heavy luggage. So, this time I'll be optimizing the setup by buying a new tripod and telescope mount - here's what I just ordered yesterday from a German shop:

The Berlebach Tripod UNI 8 is a transportable tripod for astronomical mounts - best quality "made in Germany". The low height makes it ideal for Newtonian telescopes, 323 euro.

  • Weight 6 kg - 13.2 lb.
  • Minimum height 60 cm - 24 inch
  • Maximum height 83 cm - 33 inch
  • Transportation length 67 cm - 26 inch
  • Load capacity 60 kg (121 lb) with very good vibration damping
  • Stable accessory tray (37 cm)

The leg lock offers an even spread and prevents the legs from slipping, 58 euro.

  • Suitable accessory tray included
  • The legs are locked in a defined angle of 23°
  • The spread stopper comes readily installed with the UNI tripod

Berlebach tripod bag 24cm / 70cm length, 42 euro

TS AZ5 Alt-azimuthal Mount with fine adjustment in both axes. A very stable alt-azimuthal mount. Accommodates two different instruments in parallel. Features:
  • maximum load 13 kg, at full stability
  • fine adjustment with clamping in both axes
  • telescope mounting with robust quick coupling with area clamping
  • further attaching with 90° offset for binoculars or spotting scopes - up to 5 kg can be kept in balance
  • counterweight shaft included in delivery, can be attached in two positions
  • with versatile tripod connection
Berlebach Tripod Adapter from UNI to Vixen GP, Skywatcher EQ5 and similar. This adapter is necessary for using Vixen GP and SkyWatcher EQ5 mounts with the Berlebach UNI tripods.


For viewing the partial phases I have a 70mm refractor with a H-alpha filter - this can go on the same mount as the photography equipment since the mount can accept two scopes. Thereby I only have to bring a single tripod and mount instead of two!

Friday, May 19, 2017

I'm baaack.....

Hi world,

it has been three years since the blog was last updated. About time to get back to it! Since last time I have been on three eclipse expeditions to Ethiopia, Indonesia and Madagascar. Check out this movie we made from totality in Indonesia!

Ingrid and the corona - Indonesia 2016
Now I am warming up to the next total solar eclipse which will occur in the U.S.A. on August 21st, 2017. I am leading a group from Viktors Farmor to Oregon. In addition to providing a great experience for the guests I'll also attempt to photograph the eclipse using a 4-inch refractor and a DSLR camera. I have done almost all kinds of astrophotography over the years and a total solar eclipse is - by far - the hardest project to undertake. I have failed three times and succeeded once. Even with the one where I finally got the images the post-processing of these to yield a final result has proven so daunting that I haven't yet done it!

Still, I'm trying again. Follow this blog in the coming months to see how it goes.

Monday, April 21, 2014

Autostakkert / Avistack - a casual comparison

In this post I will compare the output from two of the best programs for sorting, aligning and stacking numerous exposures: Autostakkert v2.3 and Avistack v2.0. The subject is solar H-alpha images. The latest Avistack version is from July 2010 so it is not exactly undergoing a hectic development! Autostakkert is newer and is in a more dynamic development phase with minor updates occurring many times pr. year.

I did not spend a lot of time tweaking the processing parameters with Autostakkert - instead I deliberately did a 'quick run' using most settings at their default values. Avistack I know quite well and have been using for solar image processing for the past two years. During this time I have tweaked the settings to best suit my data. Hence, in a way the comparison is not 'fair' - that's why I called this a 'casual comparison'! See the cropped images below for the results, figure 1 is a prominence and figure 2 is an active region around a sunspot.

Figure 1 was made using 1500 frames from a Coronado filter on a 70mm f/7 refractor. The best 60 were used for the final image which then had wavelets applied to sharpen it (same settings for both images of course).

Figure 2 was made from 700 frames taken with a Daystar filter on a 6-inch f/6 refractor. Again, the 60 best frames were used but this time no wavelet processing was applied.

Fig. 1: comparison on a prominence.

Fig. 2: comparison on a sunspot.
The results are not dramatically different; both Autostakkert and Avistack do a very good job. However, the Autostakkert result is generally slightly better with just a little more 'omph' to it. Details of the settings are given at the end of this post - notice that Avistack has many more parameters to set. I have tried to choose settings for the programs that were similar to each other, but of course I cannot rule out that some Avistack settings exist that would allow matching or even surpassing Autostakkert. However, I do know Avistack quite well and have tweaked its parameters extensively in the past - I find that the results do not depend super critically on the chosen parameter settings.

In conclusion: Autostakkert gives a slightly better result and has much fewer parameters that require setting - a clear advantage, in my opinion. Some will balk at this 'lack of control' but sometimes there are just too many things to adjust and you can never be sure that the correct settings have been found. I find that Autostakkert is simple to use and works very, very well 'right of out the box'.


Some of the parameters used for the comparisons:

Autostakkert: image stabilization: surface, noise robust: 3, AP size 50, HQ refine: on, Drizzle: off, number of frames to stack: 60.

Avistack: quality analysis: on, frame cutoff: 60, area radius: 35, search radius: 28, alignment type: surface, ref. point min. distance: 13, structure threshold: 44, lower cutoff: 0.23, noise reduction: 0, quality area size: 32, ref. point alignment area radius: 24, ref. point alignment search radius: 2

Sunday, May 19, 2013

Throwing out the focuser

Every summer - where the Danish nights are too bright for deep sky imaging - I have fun doing Solar imaging instead. Being able to enjoy astronomy on a nice summer day without the cold and fatigue of a winter night is great!

I do high resolution imaging using a 6" f/6 achromatic refractor and a Daystar Quantum SE 0.5Ã… H-alpha filter. A Baader TZ4 tele-extender increases the magnification four-fold. When building such a setup the imaging train on the rear side of the telescope becomes really long and this leads to significant problems with flexure. Over the last few years I have optimized my setup to employ threaded connections everywhere, thus reducing flexure to a minimum. The imaging train currently looks like this:

Imaging train for high-res Solar imaging in H-alpha light (click to enlarge).
A special feature of this setup is that the telescope's original focuser has been replaced by a fixed length tube. Instead, focusing is done with a small helical focusser just before the camera. This way only the camera is moved and not the entire imaging train. This makes for much less flexure and focus slippage while shaving off nearly a kilogram from the total weight on the rear side of the scope.

Yesterday was my first time out this year with this setup and it was also first-light for the fixed-length telescope adapter. I had measured out very carefully how long it should be, but it was still scary-exciting to see whether or not I could get a sharp view using the little helical focusser at the camera. Fortunately, it worked just fine!

I only had a few minutes before having to go out but I managed to shoot active region 1748 which just a few days before unleashed four X-class flares in quick succession. More flares are likely but nothing happened during the two minutes I shot it.

AR1748, best 60 out of 2200 frames (click to enlarge).


Sunday, November 25, 2012

Eclipse 2012 - what went wrong?

It's now been eleven days since we stood in the shadow of the moon and I have now been back home in Denmark for a week. After recuperating and trying to remember what my day job is about I finally have found the energy for a very unpleasant task: finding out what went wrong on eclipse day.

Recall, that we got to see the second half of totality, with only a thin veil of high clouds present. Recall also that my ambitious project of high resolution automated imaging through a 4" refractor was a complete and utter failure.

I have worked on this project for several months. When I think about how close to success I was and revel in the details of how it failed I can almost feel physically sick. But that is exactly what I need to do; revel in details, go through it all again and try to learn from it so that I can do better next time.

Here's what happened. I set up OK, got the scope pointed at the partly eclipsed sun. Got the solar image focused and framed OK using liveview in Imagesplus. Got Eclipse Orchestrator started. Entered the precise geographic coordinates and local time from my GPS. Waited, thinking that all was ready.
Nervously awaiting totality with set-ups ready and too many clouds.

That was my second mistake (I'll get back to what the first mistake was later). I should have noticed that several small details were wrong. First, the displayed UTC time was one hour late. Second, the simulated view of the Sun did not match reality: the moon was leaving the solar disc instead of encroaching upon it.

When I discovered this we were only 15 minutes from totality and everything was just accelerating. I also had to function as the astronomical tour guide for our party of 28 paying guests. Frantically, I double checked the GPS coordinates and time, nothing was wrong. I wasted precious time restarting the PC and camera. With only seven minutes to go, I converted my script into an emergency version with only the coronal shots present (never practiced that). However, as totality began I could not start the script. Thinking that the system had somehow frozen up I realized all was lost and let it go. Instead I just enjoyed the rest of the show.

Yesterday, I went though it all again. Connected the camera, started Eclipse Orchestrator entered the local time on the PC as 6.36 AM, November 14, 2012 timezone GMT+9. Just as I had eleven days before. I saw the exact same problem - instead of totality being two minutes away the moon was just a few minutes from fourth contact! Fiddeling around I discovered, with a sickening, sinking feeling in my stomach the root cause: I had chosen GMT+9 as my timezone - it should have been GMT+10!!!!

Consequently, Eclipse Orchestrator thought that we were one hour further ahead in time than we actually were. How stupid of me.

Oh, well.

I must have been mixed up mentally by the pressure in the days since we arrived in Queensland. The tour program was very tight and I had been away from the equipment for three days because we had gone to the outback and the Daintree rainforest. I do remember entering GMT+9 on the laptop several days before the eclipse. That was a ticking time bomb and I could not overcome it on eclipse day due to the mental and temporal pressure of the unfolding events.

In the end of all this I arrive back to the feeling that all eclipse chasers have when totality ends, no matter what: when can I get to see this again?

Animated satellite images showing the lunar shadow racing across Australia and out into the Pacific (click to enlarge)

Tuesday, November 13, 2012

Eclipse 2012 - the event

We got to see the eclipse!!!

We left the hotel as planned and arrived on time. The site was open, not commercial'ish and we had a private area at the best spot, looking over the Captain Cook Highway and out over the bay. The area was warm, there was not a lot of wind and there were no bugs. The air was very moist and clouds formed and dispersed very actively. Sometimes we a got a very slight drizzle. Not the best situation, but we have known all along that this eclipse would occur under complex and active tropical conditions.

Setting up, then waiting.
I set up the equipment: Borg 4" refractor on astrotrac with Nikon D300 controlled by Eclipse Orchestrator. I also got the H-alpha scope up and running for the guests. Finally, I put an old analog Nikon camera with color film and a 55mm lens behind our crowd so that we would be framed with the eclipsed Sun. Quite a lot of stuff to tend to this time. I am pushing it to the limit - got to remember to enjoy the eclipse with my senses and be mentally - even spiritually - engaged.

 
Venus rising.
All was ready. Venus rose - bright and steady - where the Sun soon would follow. We all took that as a good omen.

After first contact just eight minutes after sunrise, things seemed to progress very rapidly. The time from first contact to totality spanned just 54 minutes. Measured GPS position and time; entered into the software. Found the sun, focused using ImagesPlus, then went back to Eclipse Orchestrator.

Fifteen minutes before totality things started to go wrong. Large clouds started drifting past the sun. I noticed that Eclipse Orchestrators simulated view of the eclipse did NOT match reality. I scrambled - was the GPS coordinates entered wrong (no!), was the time (no!). Reboot and try again, same problem. If the software is not in synch with reality the images will not fire off at the right moments and all would be lost. Just seven minutes to go. Instead of just dumping the project and dedicating myself to enjoy the spectacle I frantically made an emergency script, using the last few minutes with my head at the computer screen. Suddenly totality started, but a cloud was blocking the sun - none of the usual ahhs and oohhhs from us all; more like a tense mumbling.

One percent makes all the difference.
I tried to initiate the emergency script but found that Eclipse Orchestrator was not responding. The fully eclipsed sun came out from behind the cloud only covered by a thin veil of haze. VERY BEAUTIFUL! All was lost with my imaging project. I ran up to the analog camera and fired off some shots of the spectacle.

I think we got the last two thirds of totality including the diamond ring and Baily's Beads. I spent too much time fiddling around and the whole thing ended before I could find myself mentally participating. Too much ambition, too little time. Leaves me a bit frustrated.


The inner corona and numerous prominences.
Still, the luck we had in seeing the totality at all was amazing. Moments later a large cloud came by and blocked the sun for ten minutes.Although a bit frustrated I am mostly very happy. I had fun doing the preparations and I will probably find time to analyze what went wrong and try again some other time. For the eclipse chaser there always comes another time!

Be sure to click all the images to get a better sense of what happened this morning. The photographer is Inge-Lise Krylbo, one the participants on this journey. More photos will follow in the coming days and we'll also hear about how it went for other observers here in tropical Australia.

Eclipse 2012 - this is it!

It is 3.00 AM. Spent all night preparing. Sky looks promising; about 70% clear. Packing up and eating some food. Will meet with one of the guests who knows about weather and confirm that we are going to our primary site.

I am nervous about forgetting some essential piece of hardware so I better finished. We are leaving in 40 minutes. Next update will be after totality!

Eclipse 2012 - update before totality

>>>>>>>>  This update posted 1.5 hour before we leave the hotel  <<<<<<<

I put the gear together - went OK. Found that the 4" scope was out of collimation, as expected after the outback roads. Got it collimated OK. For this I used my artificial star, but had to pause halfway into the process because it started to rain. These tropical drizzles just come and go all the time! Scary.

Checked the Eclipse Orchestrator script once again. Found that the image sequences for the Baily's Beads and the Diamond ring effect were switched around on both sides of totality!! I got them switched around so that prior to totality the Baily's Beads comes first, then the diamond ring. Reverse after totality. Whew... Good I discovered that! Ran the script and saw that camera performs as it should.

I can't practice polar alignment on stars due to too many clouds, so I am opting for using the compass instead. Adjusted the astrotrac wedge to 16.5 degrees south. Adjusted the compass to 7 degrees eastern magnetic declination. This will have to do.

Our planned location - 2 km north of the centerline.
I'll transport the gear semi assembled, with the Borg scope in my hands in the bus so that it doesn't get shaken too much. The guests really want to help so they'll get to carry as well.

We'll have to drive 15-30 minutes south of town to a site just 2 km north of the center line. The bus leaves at 3.30AM - just 1.5 hour from now.

Just went outside and looked at the sky - it is clear! Orion and Sirius are near zenith.

Below is a NOAA IR image of the cloud situation 45 minutes ago. At that time it was cloudy here.
NOAA IR enhanced image 14.11.2012, 1:09AEST.
Red cross shows our location


Eclipse 2012 - arrival in Port Douglas!

We have just arrived in Port Douglas - the place where we will (hopefully!) be seeing the total solar eclipse. We are now just 11 hours from totality and I have a million things to do, mostly dealing with setting up the hardware. We have been in the outback and rain forest for three days out of contact with  the world.

I brought the telescopes along in the bus. That was a mistake. We've been bumping around on the roughest roads ever and the collimation must be way off by now; gotta check that shortly.

I'm back in a hotel room with Esben, our snoring tourleader. That doesn't matter much because I won't be sleeping tonight anyway. We have chartered a bus to pick us up here at 3.30AM to be at our designated site - south of here - at 4.00AM. I'll do a last minute weather satellite check and if there are clear indications that the chances will be better up north we will drive that way instead. I hope that won't be necessary.

Check out the latest weather outlook below. Scary!!!!

Latest outlook. Why do they show those nasty icons when only 'trace amount' of rain are expected and the cloud cover is 'only' 19-31%??????


Saturday, November 10, 2012

Eclipse 2012 - bad night, good news

I just had a pretty bad night; had to share a room with Esben, our tour leader from Viktors Farmor. He's really a nice guy but he snores - and it was very hot. Didn't get much sleep. I'll have to do the same on the night before the eclipse.

I used the night to charge as many batteries as I could - will do the rest in the coming days.

Just before leaving for the Bama way I checked the weather outlooks. They have improved relative to yesterday; see below!!!

Eclipse day weather outlook - not bad!!!


Eclipse 2012 - Queensland

Today we arrived in Queensland - the tropical north-eastern part of Australia where the total solar eclipse will take place just 3 1/2 days from now. It was cloudy 90% of our time in New South Wales, it was cloudy out of the airplane window all the way up here and it is cloudy right now. So much for the sunny, arid continent!

After arrival we learned that the itenary will take us up the 'Bama way' which is an aboriginal rainforest, outback path inland that should be very fantastic to experience. The catch is that we will not be able to bring any luggage of significance - hence I will be separated from all the astro-equipment that I was planning to start putting together in the coming days. Doing final practicing, alignments, checking. Now I won't be able to do that until just 10-12 hours before the eclipse!! Good thing that I practiced a lot at home.

On the Bama way: Willie Gordon, elder of the Nugal-Warra people


Friday, November 9, 2012

Eclipse 2012 - Siding Spring Observatory

Visiting comet-guru McNaught at Siding Spring.
Touring Siding Spring Observatory was great fun. We met Robert McNaught, discoverer of 73 comets and 410 asteroids, and heard about his work. We saw the great telescopes and took in the beautiful landscape views from the mountain.

Observing an outburst on the Sun
We have finally been getting a few minutes of sunshine in the mornings and I have started setting up the H-alpha scope for solar viewing with our tour guests. Yesterday witnessed an outburst from active region 1611 near the limb of the Sun. I hope that this region and others like it will be present during the eclipse next week - the more action the better on eclipse day.

Today we will leave New South Wales and fly north to Cairns. Mentally and physically this signals the next - eclipse - phase of our journey. Up until now I have not pulled out the photographic setup from my baggage stores, but starting tomorrow it will be time for that. I really hope there will MUCH more clear skies up north so that I can get som sky-time for the final preparartions.

Wednesday, November 7, 2012

Eclipse 2012 - script design


I have now finalized the design of the pre-programmed sequence of images to be taken during totality. Recall that I will be using a Nikon D300 DSLR with a four inch f/6.4 refractor on an Astrotrac equatorial mount. This setup will be under fully automated PC control using the 'Eclipse Ochestrator' software.

In China (2009) I used a similar setup but failed to get good images because the time interval between images was too short, causing the camera to freeze up. This time I am using a camera recycle time of 0.8 seconds which I have previously found should avoid this problem.

My setup is quite heavy and on the limits of the mount capacity. Consequently, the whole thing is fairly prone to vibrations. To minimize the risk of shutter induced vibrations I'll use a mirror lock-up time of one second. Still, from previously testing, I do expect that a significant fraction of the shots will be blurred due to wind induced mount vibrations, so it is important to shoot as many images as possible.

Using the script wizard in Eclipse Orchestrator I can generate a rough initial script to see how many shots can be pressed in during each brief phase of the eclipse. The program also chooses reasonable exposure times based on the actual setup.

I tweaked the auto-generated script so that the Earthshine shots were centered on the deepest part of the eclipse. I could also press in one extra corona image series plus a few extra corona shots here and there. Click the image below to see an overview of what I'm going to attempt. When running the script with the camera connected I see that the exposure settings are updated correctly and that the camera does not lock up. Hurray!

Camera control script - click image above to get full size version
I chose to use ISO=200 for which Eclipse Orchestrator suggested these exposure times:

  • partial phase (with filter): 1/1250 sec.
  • diamond ring: 1/160 sec.
  • Baily's beads: 1/8000 sec.
  • chromosphere: 1/5000 sec.
  • prominences: 1/2500 sec.
  • Earthshine: 3 sec.
  • corona: 1/640, 1/200, 1/80, 1/30, 1/10, 1/4, 1/1.3 sec., corresponding to optimal coronal imaging at Rs=0.1-4.0
I hope that these times will prove to be OK!

Yesterday we approached Coonabarabran and on the way experienced the world's largest solar system drive. At the Jupiter stop, 22 km from Siding Spring Observatory, I couldn't resist attempting some serious observing!

Getting up close to Jupiter (click to get even closer!)