Wednesday, June 6, 2012

Venus transit 2012

Had a fantastic transit experience at Charlottenlund Fort, Copenhagen! Will be posting some pictures here as they are processed - stay tuned. Become a follower of this blog to get updates automatically.


Sun had just cleared clouds at horizon.
I'm at work right now and better get back to it!!
---------------------------------------------------------------------------------------------
Home from work, get Astrid in kindergarten, go to playground, make dinner, wash floor. I am pretty tired now - I only got two hours of sleep in the past 36 hours. I just got to try and process some data from my new solar telescope. I only got time to try it ONCE before the Venus transit. Just did some basic processing; see result below (click here for full resolution). I am HAPPY! Will play more tomorrow, but now I'll go to sleep with a smile.
Venus with a small protuberance - just before the show ended.
-----------------------------------------------------------------------------------------------
Had a terrible headache yesterday, which I often do after going all-out for some crazy event. Today I feel fine and I tried to see if the refraction of light in Venus' atmosphere was captured in some of my images. The setup I am using with a H-alpha filter is not optimal for this purpose - it transmits a very small fraction of the Sun's light, forcing me to use long exposure times which in turn will be more susceptible to blurring from our own atmosphere. I think that a white light filter would have been better. Anyway, between third and fourth contact I tried shooting at several (longer) exposure times:
Changing the exposure time to catch a glimpse of sunlight refracted in the atmosphere of Venus
Looking closely at the image with the longest exposure time I can just barely make out a faint arc of light that follows Venus' limb! It is visible for roughly 30 degrees across the north pole of the planet. I tried manually selecting the best images in the sequence, then stacking and tweaking curves. I also applied a DDP filter and unsharp mask to enhance the arc further - see the result below.
Processed image revealing sunlight refracted in the atmosphere of Venus.
This sighting is nowhere near the quality obtained by others in 2004 - I think this is due to the low altitude of Venus as seen from this part of the world. For the ultimate view of this effect check out this image from the Hinode spacecraft!
----------------------------------------------------------------------------------------------------------
Working through all the images I took on June 6th I have now completed basic processing of all the image sequences - 27GB in total, consisting of 24410 individual images. 'Basic processing' means using Registax v.5 to sort, align and stack with a focus on the disc of Venus. The Venusian disc will then be sharply defined, but orbital motion of Venus will cause a slight blurring of the Sun. I therefore do a second processing run using AviStack v.2 and focussing on the solar surface while ignoring Venus. I typically stack 60 images since this (in my experience) is a good compromise between using only the sharpest images and keeping the noise level down in the final result. Each stacked image is sharpened using wavelets, then the two are combined in Photoshop to get both Venus and the solar surface sharply defined. Final touches include colorizing the image and tweaking of levels and curves. My latest result is shown below - taken at precisely the moment of third contact (full resolution is HERE). The resolution, contrast and colors are better than on the previous close-up view shown above - maybe because the first one was made in a zombified state of fatigue..!?
Venus transit - moment of third contact.


Thursday, May 24, 2012

First light with new solar imaging setup!

This is a report from the 'first light' session with my new high resolution solar imaging setup!

During the bright summer months here in Denmark I stop work on deep sky or planetary imaging and switch to solar. I do H-alpha imaging with a Skynyx 2-2M camera, i.e. the 'lucky cam' technique with thousands of images.

In the past years I have been on a trend towards ever higher resolution. It started with increasing my focal length to get better sampling on a Coronado SM60 setup. Next, I increased the aperture to 100mm by acquiring a Daystar rear-mounted filter (back-to-back comparison with Coronado is here). This year I purchased a second hand 152mm F=900mm achromatic refractor to use with the Daystar. Normally (and safest!) a Daystar is used with a front mounted energy rejection filter (ERF), but on the Daystar Yahoo forum I heard that this could be replaced by a high quality UV/IR filter that is mounted internally. ERF's are VERY expensive for large apertures so this trick was really what inspired me to try working at six inches.

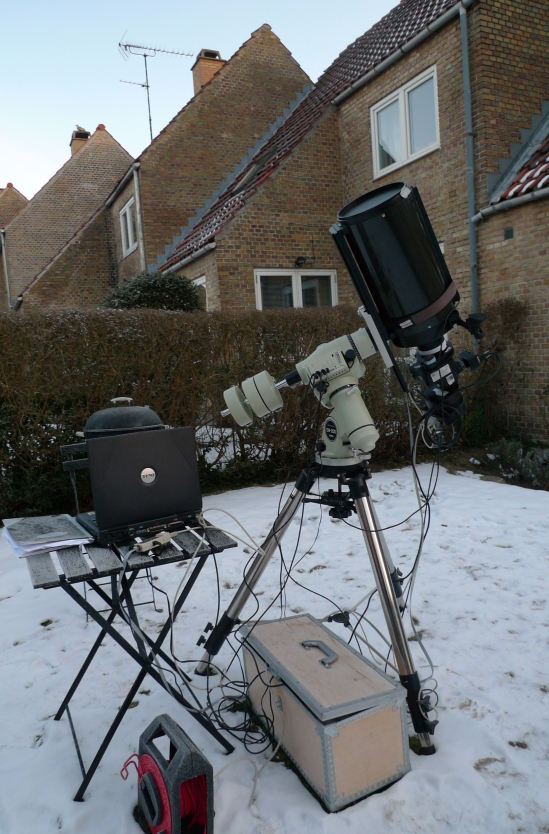
The scope is a Chinese made achromat mounted on a Takahashi EM-200 equatorial mount. The scope mechanical quality is very good for the price level and I have heard that the optics also are good - especially when the light will be filtered and a tele-extender is used with a small chip camera. Super-duper APO's with super-duper H-alpha filters are really a joke! I had made special adapters so that a Baader 2" UV/IR rejection filter could be placed just after the focuser. This is the highest quality filter and nothing less must be used for this kind of application out of safety concerns. The filter is mounted in a way so that it is not carrying any weight. This is important since a very long imaging train causing lots of torque is used. After some T2 spacer tubes I have a Baader TZ4 tele-extender, then comes the Daystar Quantum SE H-alpha filter. The spacer tubes places the TZ4 at the optimal position relative to the telescope focal plane while ensuring that the 3" Crayford focusser is not extended at all - thus minimizing problems with a sagging drawtube. After the Daystar comes a lightweight helical focusser from Borg and then the Skynyx 2-2M camera. The helical focusser enables me to only move the camera and not the entire long, huge and heavy imaging assembly. Everything is screwed securely together (no draw tubes or clamping rings) to minimize sagging. To achieve this is a true nightmare in adapters! Check out the photos of this setup below.

6" solar imaging setup on Takahashi EM200 mount. Note that dew cap is fully retracted to avoid possible tube currents.

Details of the assembly for high resolution solar imaging
After fiddling with all the spacer tubes and adapters in the imaging assembly I had time to try a few shots. I took two 90 second sequences consisting of ~1500 images of active region 11484. First the Daystar was at 6563.8Å and then I set it to the H-alpha wavelength of 6562.8Å. Images below are stacks of the 60 best images followed by some wavelet sharpening:
AR11484 @ 6563.8Å. Total length of this complex is ~120 arcsec.

AR11484 @ 6562.8Å a few minutes later.

I did not bother to remove traces of Newton rings. The images were taken two hours past midday over a low black roof, so the seeing should not have been to good. Finally, I have not checked the scope collimation after it arrived. Still, I estimate the resolution to be around 1 arcsecond - not bad for a first try. I can't wait to play more with this setup over the summer. Let's hope for clear weather during the Venus transit on June 6th!!


Wednesday, May 23, 2012

M100 processing - Part 5

I have now calibrated and rejected bad data, so the original 1064 image files have been reduced to 96 LRGB light frames. In this post I will reduce this further to just four - one for each filter. I use MaxIm for stacking with the 'Auto - Star Matching' alignment method. I have previously found that bi-linear interpolation produces slightly sharper - but also more noisy - images than bi-cubic interpolation. On the RGB data I'll go for bi-cubic since resolution does not matter so much here. On the luminance data let's see what can be gained by bi-linear/bi-cubic and all/best half stacking:

FWHM of stacked luminance frames:

                         Bi-cubic:             Bi-linear:
All frames:         3.53"                  3.45"
Best half:           3.41"                  3.31"

By 'best half' I mean using only the sharpest 50% as defined by the image FWHM value. The FWHM can be reduced ~6% by using bi-linear and 'best half' compared to using all images and bi-cubic interpolation. However, the SNR of faint regions of M100 is cut in half by doing so and I think this is too high a price to pay. Instead, I’d rather have high SNR and then later try my luck with deconvolution which really demands low noise data. See for yourself below - there isn't much difference visible between the two results!
Enlarged sections of stacked luminance frames. There is no significant difference visible, but the computer tells me that SNR is better on the bi-cubic/all image.
For aligning  images from various filters I use a common reference image from the luminance stack. This reference is of course not included in the stacking process, but it ensures that the resulting, stacked LRGB images are aligned to each other.

Next step will be to experiment with deconvolution on the luminance image, so stay tuned!


EXTRA NOTE ABOUT IMAGE COMBINING IN MAXIM:

I should mention a problem with MaxIm I encountered while combining the luminance data. I have two sets of sub-exposures - one from March 25th and another from March 27th. By mistake I used a different guide star on these two nights and as a consequence the two image series are pretty severely misaligned:
Two sub-exposures that are severely misaligned.
Still, the data from both nights is good so I'll go ahead with alignment and combining. Note that the two nights produced a different background level - one the first I had ADU=1700 while on the second I got ADU=2300. In MaxIm I use the 'Auto - star matching' alignment mode which works very well, then combine using 'Sigma-clip' combine method and 'delta-level' normalization. The result is shown below.
Problem: combined image has a large offset where the sub-exposures fail to overlap.
I spent several days pondering this problem without success. Only when writing this blog post did the correct line of thought come into place - and with that, a solution! I think the problem arises in two steps. First, during alignment, MaxIm sets pixel values outside the original field of view to zero (other programs often chose to use a median edge value). On my images this will result on a lot of zeroes, due to the large misalignment between the two nights. Next, during image combination, this zero-value creates an offset on the combined result, as shown above. The solution is very simple: just activate the 'Ignore black pixels' option on the 'Combine' tab. As shown below this fixes the problem. Of course the background still exhibits a discontinuity in noise level where the two dataseries fail to overlap but this is quite natural and easy to handle later on.
Problem solved: use 'ignore black pixels' option!


Tuesday, May 1, 2012

M100 processing part 4 - FWHM evaluation

I have now finished working on rejection of blue and luminance data. In total I acquired 180 light sub-exposures through LRGB filters, representing 36 hours of integration time. Of this I wounded up rejecting roughly half due to a fading deep sky signal or high background level. I knew this would happen and that is partly why I took so much data - even after rejection I still wanted to have enough for a low noise image.

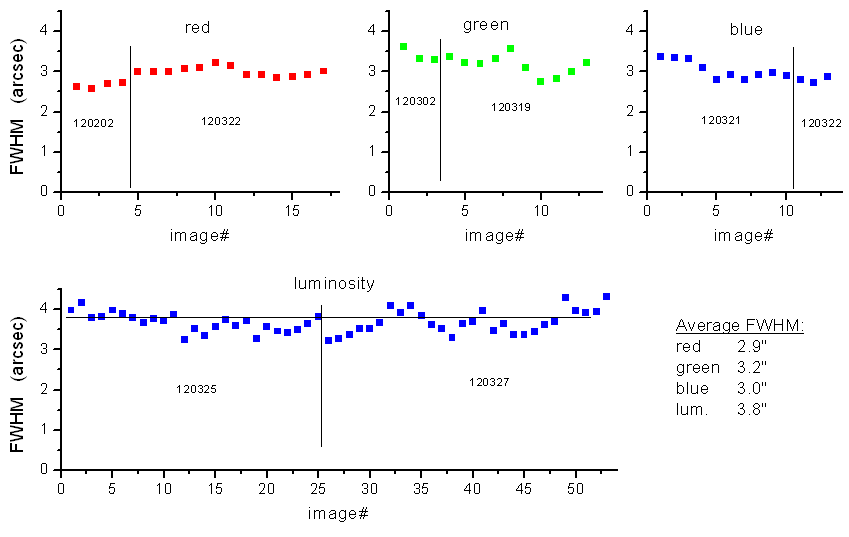
So, from a total of 1064 individual files prior to any processing (most of which were calibration data) we are now down to 96 light frames of reasonable quality! Next step is to look at the average stellar FWHM to see if more rejection is needed. For this I use CCDInspector:
FWHM on remaining sub-exposures (click for larger version)

Average FWHM with RGB filters is around 3.0" while it is 3.8" for the luminosity data (UV-IR rejection filter). Is this just because of poor seeing on those nights or is it typical a broader bandwidth results in fuzzier images? I suspect the latter, but I am not sure. I use a RC astrograph with no refractive elements except for the deflection plate in my AO-8 tip-tilt guider.

For the RGB data I will not reject any images due to FWHM since none of them differ significantly from the mean. On the luminosity data I want to pursue maximum sharpness and here I might choose to explore if something can be gained by stacking only the best half. Stay tuned!

Wednesday, April 25, 2012

M100 - part 3


Green filter sub-exposure. Note the remaining dust rings on the background.

Ups. I discovered that my calibrated green filter subexposures suffer from remnant dust rings which are visible on the background at high contrast setting.

Suspecting MaxIm's auto-calibrate I tried to calibrate manually but it made no difference. Something must be wrong with my flats - what I do not know. I will ignore this for the time being and sort as usual. Will use 13 out of 32 subexposures. I rejected due to high background values (from passing haze) or due to fading of the M100 arm visibility.

Note: two different exposure times were used on the selected 13 sub-exposures: 1200sec and 900sec. That was not wise and will cost me when doing further processing. Still, despite these problems with my green data, I will press on.

Sunday, April 22, 2012

M100 - part 2

I have decided to try and blog each time I have worked on my M100 image processing project. Maybe someone will find it interesting?

First step was to collect all the files (lights, darks, flats, flatdarks) in one folder; this amounted to 1064 images! Next step is to use MaxIm's 'Set Calibration/Auto Generate' feature to automatically detect and group all calibration frames. I let MaxIm replace all the calibration frames with stacked master frames - the total number of images was now reduced to 204.

After calibrating the light frames and I saved them into another folder. I checked manually to see if MaxIm managed to do the flat field correction properly since I have seen problems with this before. Now, to my great relief, it worked!

Rejecting sub-exposures - on my setup this is typically due to haze and light pollution.
Next step is to load all images for a given filter into Mira and inspect them. Mira is not a well known program these days, but I like the 'image set' feature where you can load and animate a series of images in a single window and measure background levels in a user defined region. In my experience, a combination of background level measurements and visual inspect is the best method for deciding which images to reject and which ones to use. Drifting haze and clouds coupled with light pollution is my most common rejection reason. Today I managed to inspect the red series; out of 29 1200 second sub-exposures I chose to use 17 (see the image with this posting). I do not only reject on the basis of background level, but also if the target contrast is reduced. I rarely see bad images due to tracking issues or wind-buffeting on the AT8RC setup I'm using here. When my initial rejection has been done I'll measure the stellar FWHM in each image with CCDInspector.

Next time I will continue this task on the green, blue and luminance series - stay tuned!

New project - M100


Having finished work on narrowband imaging of the Bubble and Jellyfish nebulas I am now moving on to M100 with LRGB filters. The key difference here is more light and shorter exposures. I tried to get lots of data so that I could use only the best and get good SNR. Good SNR will hopefully enable deconvolution - my big quest these days is high resolution. Collecting the data yesterday I found that it amounted to eight nights and more than 1000 files incl. calibration frames!

-Mikael